I wanted to set up Wireguard on a VPS, not only to tunnel IPv4 traffic, but also allowing me to tunnel IPv6 traffic. As this is IPv6 of course I preferred not to use NAT, but to assign a public IP address to the client. I read some documentation and blog posts, but I struggled getting it to work. Most tutorials I found on the Internet, create a separate IPv6 subnet for the VPN but I could not get this to work. For some reason, IPv6 traffic successfully went through the VPN tunnel and then exited the VPN gateway, but then any response never reached my VPN gateway and hence also not the client.
I decided to try another way: using an NDP proxy. NDP or the Neighbour Discovery Protocol, is similar to ARP which is used in IPv4. Using this protocol, network devices can discover where on the network a certain IP is located. By letting the VPN gateway answer NDP requests for the VPN client, the gateway would correctly send back all responses to the VPN gateway, which then forwards it to the VPN clients.
Configuring the network on the VPN gateway
I use systemd-networkd to set up the network. It’s the most modern way of network configuration and works the same on all distributions using systemd, but of course you can make the same settings in /etc/network/interfaces or whatever your distribution uses. Of course when making changes to a remote server, make sure you can access a console without needing a working network connection on the server, in case things go wrong and the network connection breaks.
On my VPN server, the public network interface is named ens192 (use the command $ ip addr to find it on your system). My public IPv4 address is www.xxx.yyy.zzz with subnet 255.255.255.0 and gateway ww.xx.yy.1. I have the 64 bit IPV6 prefix aaaa:bbbb:cccc:dddd and the IPv6 gateway is fe80::1.
Add a [Peer] section for every client, and change the both the IPv4 and IPv6 address in AllowedIPs so that they are unique (replace 2 by 3 and so on) .
On the clients, create /etc/wireguard/wg0.conf with these contents:
In the [Interface] section make sure to use the same IP addresses as the ones you have set in the corresponding [Peer] section on the VPN gateway. Set the DNS name (or IP address) of the VPN gateway as Endpoint in the [Peer] section. The hostname’s DNS entry can have both an A and AAAA record. You can replace your DNS servers by your preferred ones. You can also consider running your own DNS server on the VPN gateway.
Make sure that all wg*.conf files on client and server are only readable by root, because they contain private keys.
Make sure you have shorewall and shorewall6 installed:
# apt install shorewall shorewall6
Shorewall6
First we create a separate zone for our VPN in /etc/shorewall6/zones:
fw firewall
net ipv6
vpn ipv6
Then we configure the network interfaces and assign it to the right zone in /etc/shorewall6/interfaces:
net NET_IF tcpflags,routeback,proxyndp,physical=ens192
vpn wg0 tcpflags,routeback,optional
Then we allow connections from the VPN to the firewall and to the Internet in /etc/shorewall6/policy:
$FW net ACCEPT
vpn net ACCEPT
vpn $FW ACCEPT
net all DROP $LOG_LEVEL
# The FOLLOWING POLICY MUST BE LAST
all all REJECT $LOG_LEVEL
Keep in mind that your VPN client will have a public IPv6 address, which is accessible from the Internet. The rule net all DROP protects your VPN clients against access from the Internet.
Then we create some rules which allows access to the SSH server and the Wireguard VPN server from the Internet in /etc/shorewall6/rules:
Invalid(DROP) net $FW tcp
Ping(DROP) net $FW
ACCEPT $FW net ipv6-icmp
AllowICMPs(ACCEPT) all all
ACCEPT all all ipv6-icmp echo-request
SSH(ACCEPT) net $FW
ACCEPT net $FW udp 51820 # Wireguard
For IPv4 we configure Shorewall to use NAT to provide Internet access to the VPN clients.
/etc/shorewall/zones:
fw firewall
net ipv4
vpn ipv4
/etc/shorewall/interfaces:
net NET_IF dhcp,tcpflags,logmartians,nosmurfs,sourceroute=0,routefilter,routeback,physical=ens192
vpn wg0 tcpflags,logmartians,nosmurfs,sourceroute=0,optional,routefilter,routeback
/etc/shorewall/policy:
$FW net ACCEPT
vpn net ACCEPT
vpn $FW ACCEPT
net all DROP $LOG_LEVEL
# The FOLLOWING POLICY MUST BE LAST
all all REJECT $LOG_LEVEL
/etc/shorewall/rules:
# Drop packets in the INVALID state
Invalid(DROP) net $FW tcp
# Drop Ping from the "bad" net zone.. and prevent your log from being flooded..
Ping(DROP) net $FW
SSH(ACCEPT) net $FW
ACCEPT net $FW udp 51820
/etc/shorewall/snat:
MASQUERADE 192.168.7.0/24 NET_IF
/etc/shorewall/shorewall.conf:
IP_FORWARDING=Yes
Compile and load the rules and enable Shorewall permanently:
Then in order to make sure that the gateway knows that the VPN client aaa:bbb:cccc:dddd::2 is reachable via the VPN gateway, we need to set up NDP proxying. The Neighbor Discovery Protocol is similar to ARP in IPv6.
In a previous version of this guide, I configured NDP proxying in Shorewall6. However, we can directly set this up with systemd-networkd, so this will also work if you don’t use Shorewall6 but another firewall like Firewalld. Furthermore I also experienced problems with NDP proxy settings being lost after some time, requiring a restart of Shorewall6 to make the IPv6 connection over Wireguard work again. I hope this will be fixed by settings this up in systemd-networkd.
Edit again the file /etc/systemd/network/internet.net and in the [NETWORK] section add this
A web application firewall (WAF) filters HTTP traffic. By integrating this in your web server, you can make sure potentially dangerous requests are blocked before they arrive to your web application or sensitive data leaks out of your web server. This way you add an extra defensive layer potentially offering extra protection against zero-day vulnerabilities in your web server or web applications. In this blog post, I give a tutorial how to install and configure ModSecurity web application firewall and the Core Rule Set on Debian. With some minor adaptions you can also use this guide for setting up ModSecurity on Ubuntu or other distributions.
ModSecurity is the most well-known open source web application firewall. The future of ModSecurity does not look too bright but fortunately with Coraza WAF an alternative which is completely compatible with ModSecurity is in development. At this moment Coraza only integrates with the Caddy web server, and does not have a connector for Apache or NGinx so for that reason it is currently not yet usable as a replacement for ModSecurity.
While ModSecurity provides the framework for filtering HTTP traffic, you also need rules which define what to bloc and that’s where the Core Rule Set (CRS) comes in. CRS is a set of generic rules winch offer protection to a various range of common attacks via HTTP, such as SQL injection, code injection and cross-site scripting (XSS) attacks.
Install ModSecurity and the Core Rule Set on Debian
I install the Apache module for ModSecurity, the geoip-database, which can be used for blocking all requests from certain countries, and modsecurity-crs, which contains the Core Rule Set. I take this package from testing, because it has a newer version (version 3.3.2 at the time of writing). There is no risk in taking this package from testing, because it only contains the rules and does not depend on any other packages from testing/unstable. If you prefer faster updates, you can also use unstable.
Now edit /etc/modsecurity/modsecurity.conf. I highlight some of the options:
SecRuleEngine on
SecRequestBodyLimit 536870912
SecRequestBodyNoFilesLimit 131072
SecAuditLog /var/log/apache2/modsec_audit.log
#SecRule MULTIPART_UNMATCHED_BOUNDARY "!@eq 0" \
#"id:'200004',phase:2,t:none,log,deny,msg:'Multipart parser detected a possible unmatched boundary.'"
SecPcreMatchLimit 500000
SecPcreMatchLimitRecursion 500000
SecStatusEngine Off
The SecRuleEngine option controls whether rules should be processed. If set to Off, you completely disable all rules, with On you enable them and it will block malicious actions. If set to DetectionOnly, ModSecurity will only log potential malicious activity flagged by your rules, but will not block them. DetectionOnly can be useful for temporary trying out the rules in order to find false positives before you really start blocking potential malicious activity.
The SecAuditLog option defines a file which contains audit logs. This file will contain detailed logs about every request triggering a ModSecurity rule.
The SecPcreMatchLimit and SecPcreMatchLimitRecursion set the match limit and match limit recursion for the regular expression library PCRE. Setting this high enough will prevent errors that the PCRE limits were exceeded while analyzing data, but setting it too high can make ModSecurity vulnerable to a Denial of Service (DoS) attack. A Core Rule Set developer recommends a value of 50000 so that’s what I use here.
Set SecStatusEngine to Off to prevent ModSecurity sending version information back its developers.
After changing any configuration related to ModSecurity or the Core Rule Set, reload your Apache web server:
# systemctl reload apache2
Configuring the Core Rule Set
The Core Rule Set can be configured via the file /etc/modsecurity/crs/crs-setup.conf.
Anomaly Scoring
By default the Core Rule Set is using anomaly scoring mode. This means that individual rules add to a so called anomaly score, which at the end is evaluated. If the anomaly score exceeds a certain threshold, then the traffic is blocked. You can read more about this configuration in crs-setup.conf but the default configuration should be fine for most people.
Setting the paranoia level
The paranoia level is a number from 1 to 4 which determines which rules are active and contribute to the anomaly scoring. The higher the paranoia level, the more rules are activated and hence the more aggressive the Core Rule Set is, offering more protection but potentially also causing more false positives. By default the paranoia level is set to 1. If you work with sensitive data, it is recommended to increase the paranoia level.
The executing paranoia level defines the rules which will be executed but their score will not be added to the anomaly scoring. When HTTP traffic hits rules of the executing paranoia level, this traffic will only be logged but not be blocked. It is a especially useful to prepare for increasing the paranoia level and finding false positives on this higher level, without causing any disruption for your users.
To set the paranoia level to 1 and the executing paranoia level to 2, make sure you have these rules set in crs-setup.conf:
Once you have fixed all false positives, you can raise the paranoia level to 2 to increase security.
Defining the allowed HTTP methods
By default the Core Rule Set only allows the GET, HEAD, POST and OPTIONS HTTP methods. For many standard sites this will be enough but if your web applications also use restful APIs or WebDAV, then you will need to add the required methods. Change rule 900200, and add the HTTP methods mentioned in the comments in crs-setup.conf.
SecAction \
"id:900200,\
phase:1,\
nolog,\
pass,\
t:none,\
setvar:'tx.allowed_methods=GET HEAD POST OPTIONS'"
Disallowing old HTTP versions
There is a rule which determines which HTTP versions you allow in HTTP requests. I uncomment it and modify it to only allow HTTP versions 1.1 and 2.0. Legitimate browsers and bots always use one of these modern HTTP versions and older versions usually are a sign of malicious activity.
Personally I’m not a fan of completely blocking all traffic from a whole country, because you will also block legitimate visitors to your site, but in case you want to this, you can configure this in crs-setup.conf:
Add the two-letter country codes you want to block to the last line (before the two quotes), multiple country codes separated by a space.
Make sure you have the package geoip-database installed.
Core Rule Set Exclusion rules for well-known web applications
The Core Rule Set contains some rule exclusions for some well-known web applications like WordPress, Drupal and NextCloud which reduces the number of false positives. I add the following section to crs-setup.conf which will allow me to enable the exclusions in the Apache configuration by setting the WEBAPPID variable in the Apache configuration whenever I need them.
Adding rules for Log4Shell and Spring4Shell detection
At the end of 2021 a critical vulnerability CVE-2021-44228, named Log4Shell, was detected in Log4j, which allows remote attackers to run code on a server with the vulnerable Log4j version. While the Core Rule Set offered some mitigation of this vulnerability out of the box, this protection was not complete. New improved detection rules against Log4Shell were developed. Because of the severity of this bug and the fact that it’s being exploited in the wild, I strongly recommend adding this protection manually when using ModSecurity version 3.3.2 (or older). Newer, not yet released versions, should have complete protection out of the box.
First modify /etc/apache2/mods-enabled/security2.conf so that it looks like this:
<IfModule security2_module>
# Default Debian dir for modsecurity's persistent data
SecDataDir /var/cache/modsecurity
# Include all the *.conf files in /etc/modsecurity.
# Keeping your local configuration in that directory
# will allow for an easy upgrade of THIS file and
# make your life easier
IncludeOptional /etc/modsecurity/*.conf
# Include OWASP ModSecurity CRS rules if installed
IncludeOptional /usr/share/modsecurity-crs/*.load
SecRuleUpdateTargetById 932130 "REQUEST_HEADERS"
</IfModule>
Then create the file /etc/modsecurity/99-CVE-2021-44228.conf with this content:
Whenever something hits your ModSecurity rules, this will be logged in your Apache error log. The above request has created these messages in the error log:
In the first 3 lines we see that we hit different filters which check for XSS vulnerabilities, more specifically rules 941100, 941110 and 941160 all of them having the tag paranoia-level/1.
Then the fourth line shows that we hit rule 949110 which caused the web server to return the HTTP 403 Forbidden response because the inbound anomaly score, 15, is higher than 5. Then rule 980130 gives us some more information about the scoring: we hit a score of 15 at the paranoia level 1, while rules at the other paranoia levels rules contributed 0 to the total score. We also see the scores for individual types of attack: in this case all 15 points where scored by rules detecting XSS attacks. This is the meaning of the different abbreviations used:
SQLI
SQL injection
XSS
cross-site scripting
RFI
remote file inclusion
LFI
local file inclusion
RCE
remote code execution
PHPI
PHP injection
HTTP
HTTP violation
SESS
session fixation
More detailed logs about the traffic hitting the rules can be found in the file /var/log/apache2/modsec_audit.log.
Fixing false positives
First of all, in order to minimize the amount of false positives, you should set the WEBAPPID variable if you are using one of the known web applications for which the Core Rule Set has a default exclusion set. These web applications are currently WordPress, Drupal, Dokuwiki, Nextcloud, Xenforo and cPanel. You can do so by using the <a href="https://github.com/SpiderLabs/ModSecurity/wiki/Reference-Manual-(v2.x)#SecWebAppId">SecWebAppId</a> option in a VirtualHost of Location definition in the Apache configuration. For example if you have a VirtualHost which is used by Nextcloud, set this within the VirtualHost definition:
If you have multiple WordPress sites, give each of them a unique WEBAPPID which name starts with wordpress. Add a different suffix for every instance so that each one run its in own application namespace in ModSecurity.
If you still encounter false positives, you can completely disable rules by using the configuration directive SecRuleRemoveById. I strongly recommend not disabling rules globally, but limiting its removal to the specific location from which you want them to be removed, for example by putting them with <Location> or <LocationMatch> tags in the Apache configuration. For example:
Pay attention not to disable any of the 949*, 959*, and 980* rules: disabling the 949* and 959* rules would disable all the blocking rules, while disabling the 980* rules would give you less information about what is happening in the logs.
Conclusion
ModSecurity and the Core Rule Set offer an additional security layer for web servers in your defence in depth strategy. I strongly recommend implementing this on your servers because it makes it harder to abuse security vulnerabilities.
Keep an eye on the Core Rule Set blog and Twitter account: sometimes they post new rules for specific new critical vulnerabilities, which can be worthwhile to add to your configuration.
To prevent tracking by FLoC and other tracking techniques, there is only one good solution: stop using Google Chrome. The best privacy friendly browser is Firefox, especially if you set it to strict enhanced tracking protection. If you really need to use Chrome, then at least install one of the open source extensions which disable FLoC and Privacy Badger for other tracking protection.
This can be easily done for all your websites by modifying your Apache configuration. While at it, you should set some other security and privacy related headers, notably:
X-Frame-Options "SAMEORIGIN": this makes sure that browsers will not allow your website to be included in an iframe on another domain.
X-Content-Type-Options "nosniff": This will prevent the browser from trying to automatically detect the file type of a downloaded file instead of using the MIME type sent by the server. This can mitigate attacks where a hacker manages to upload a malicious file by giving it a filename which makes it look like a harmless file type which is then served to your visitors.
Referrer-Policy "no-referrer-when-downgrade": when a visitor clicks on a link, the browser will only send the referrer when it’s not going from a HTTPS to a HTTP connection. This is fine if your URLs don’t contain any private information. If they do, then consider using strict-origin-when-cross-origin, so that only your domain name instead of the complete URL is sent as referrer if people click on a link leading to an external website, or even same-origin, which prevents any referrer being sent to external sites. You should probably do this for an internal website, web application or wiki, webmail, etc. More information about Referrer-Policy
To set these in Apache in Debian, create a file /etc/apache2/conf-available/security-headers.conf with these contents:
<IfModule mod_headers.c>
Header always set X-Frame-Options "SAMEORIGIN"
Header always set X-Content-Type-Options "nosniff"
Header always set Referrer-Policy "no-referrer-when-downgrade"
Header always set Permissions-Policy: interest-cohort=()
</IfModule>
Then make sure the mod_headers module is loaded and this file is enabled by running these commands:
Another important header to set in your SSL virtualhosts is the HSTS header: it ensures that the browser will automatically use HTTPS every time when connecting to the website in the future. Place this in your SSL enabled virtualhost:
<IfModule mod_headers.c>
Header always set Strict-Transport-Security "max-age=63072000"
</IfModule>
Then you should also add this to your non-SSL virtualhost to redirect all visitors using HTTP to HTTPS:
Of course make sure mod_rewrite is enabled if that’s not yet the case:
# a2enmod rewrite
# systemctl reload apache2
You can check your server configuration on securityheaders.com. There you can also find more information about the headers Cross-Origin-Embedder-Policy, Cross-Origin-Opener-Policy and Cross-Origin-Resource-Policy, some other security related headers. Because they require more changes to your website to implement correctly, I’m not discussing them here.
If you have an e-mail server, maybe you already are using the open source tools Amavis and ClamAV to detect malicious e-mails. ClamAV’s default virus signatures however, while being useful, still only detect a limited set of malware. Fortunately there exist third-party unofficial signatures which you can use to drastically improve the detection rate so that it becomes similar to the detection rate of commercial anti-virus software. These third-party signatures are a must-have on any mail server using ClamAV.
ClamAV can also be very useful to scan the webroot directories on web servers in order to detect malicious PHP scripts which may be installed on your server after an intrusion in a web application. Several of the third-part ClamAV definitions proposed here, specialize in this kind of malware.
Fangfrisch is a utility which automates downloading third-party ClamAV virus definitions. It has several free repositories containing ClamAV signatures configured by default, but you can also easily add other ones.
Third-party ClamAV virus definitions
SaneSecurity
SaneSecurity is a set of signatures focusing on so-called 0-day and 0-hour malware, which means that it includes hashes of new malicious files being sent by e-mail. Furthermore it contains signatures for malicious URLs, common spam and phishing messages and generic signatures which detect some commonly types of techniques used in malware, such as exe files with a double extenstion (for example pdf.exe), exe files hidden in ISO files and often abused functions in MS Office macros. Sanesecurity also distributes signatures from other sources, such as phishing URLs from phishtank.com. A complete list of available signature databases can be found on their website.
The French company SecuriteInfo claims that their ClamAV definitions add 4.000.000 signatures for malware and spam not detected by the official ClamAV signatures. There is a free feed of the signatures available, however it only contains signatures older than 30 days. For up-to-date 0-day malware detection, you will need one of the paid plans.
In the MalwareBazaar database you can see that SecuriteInfo is often the only ClamAV definitions database which detects malicious Windows binaries.
Malwarepatrol
MalwarePatrol is a commercial threat intelligence company which offers free and paid feeds, including ClamAV virus signatures which contain URL’s pointing to malware files on the world wide web. The free feed is only updated every 72 hours, while the paid feed is updated every 4 hours. If you need an invoice or want to use the feeds for protecting customers of your company, you will have to use the commercial feeds.
Quickly after integrating the free feed in my Amavis installation, I noticed it was wrongly blocking legitimate mails with links to arxiv.org/pdf, which is used a lot in academic environments. So be careful when you integrate this feed. For this reason you should not automatically block all messages marked by Malwarepatrol. With Amavis you can give them them a positive spam score. In combination with the score from the Bayes spam filter, legitimate mails will not be blocked.
MalwareExpert
MalwareExpert offers a commercial, paid feed of signatures which detect malicious PHP files, meant for scanning your web servers.
URLHaus
URLHaus is a project from abuse.ch collecting URLs of sites distributing malware. They offer a ClamAV signature database of all these malicious URLs so that you can block all e-mail containing links to sites distributing malware. This database can be used for free, both for commercial and non-commercial purposes.
Clam-punch
Clam-punch is described as a “highly curated set of signatures for ClamAV”. It seems to focus mainly on malicious macros in MS Office documents. They do not seem to be updated regularly any more, however as the signatures appear to be rather generic, they can probably still be useful.
TwinWave Security Twinclams
Twinclams is a Github repository by TwinWave Security and contains signatures for malicious MS Office documents. The author of twinclams appears to be a contributor of Clam-punch. This ClamAV virus database is getting updated daily and appears to be highly effective in detecting newly found Office documents with malicious macros. Recent malicious Office document in the MalwareBazaar database are almost always detected by the Twinclams definitions, sometimes even detecting files which are not detected yet by commercial anti-virus software.
R-FX Networks Linux Malware Detect
Part of its Linux Malware Detect (LMD) tool, R-FX Networks offers a set of ClamAV signatures specializing in detecting Linux specific malware, including malicious PHP scripts, trojan horses such as malicious IRC bots, worms, etc.
InterServer
Another set of ClamAV signatures focused on malicious PHP scripts is maintained by the hosting provider InterServer. I highly recommend this feed if you want to scan your web servers.
Unfortunately Debian does not have a package for Fangfrisch, so you need to install it manually. In contrast to the documentation, I prefer to install fangfrisch in /opt though, using /var/lib/fangfrisch only for the database, and saving the signatures in /var/lib/fangfrisch/signatures, so that we can check them later on before letting ClamAV use them.
Create the file /etc/fangfrisch/fangfrisch.conf with these contents:
[DEFAULT]
db_url = sqlite:////var/lib/fangfrisch/db.sqlite
# The following settings are optional. Other sections inherit
# values from DEFAULT and may also overwrite values.
local_directory = /var/lib/fangfrisch/signatures
max_size = 5MB
on_update_exec = /usr/local/bin/setup-clamav-sigs
on_update_timeout = 42
log_level = info
[malwarepatrol]
enabled = no
# Replace with your personal Malwarepatrol receipt
# receipt = XXXXXXXXX
# change product id if necessary.
# 32 = free guard, 33 = Basic Defense yearly, 34 = Basic Defense monthly, 37 = Basic Defense EDU/Contributor
# product = 32
# This is untested
[malwareexpert]
enabled = no
max_size = 20M
prefix = https://signatures.malware.expert
interval = 1d
# serial_key = xxxxxxx
url_malware.expert_fp = ${prefix}/${serial_key}/malware.expert.fp
url_malware.expert_hdb = ${prefix}/${serial_key}/malware.expert.hdb
url_malware.expert_ldb = ${prefix}/${serial_key}/malware.expert.ldb
url_malware.expert.ndb = ${prefix}/${serial_key}/malware.expert.ndb
[sanesecurity]
prefix = https://ftp.swin.edu.au/sanesecurity/
max_size = 10M
enabled = yes
interval = 1h
url_malwareexpert_fp = disabled
url_malwareexpert_hdb = disabled
url_malwareexpert_ldb = disabled
url_malwareexpert_ndb = disabled
[securiteinfo]
enabled = no
# uncomment the next line if you want to use the securiteinfoold.hdb database with old signatures
# max_size = 500MB
# Replace with your personal SecuriteInfo customer ID
# customer_id = abcdef123456
# Remove the exclamation mark before the next databases if you have the Professional subscription
!url_0hour = ${prefix}securiteinfo0hour.hdb
!url_securiteinfo_mdb = ${prefix}securiteinfo.mdb
# The next databases are disabled by default in fangfrisch because they are prone to false positives, but we reduce most of them to a spam score in Amavis
url_old = ${prefix}securiteinfoold.hdb
url_spam_marketing = ${prefix}spam_marketing.ndb
[urlhaus]
enabled = yes
max_size = 2MB
[twinwave]
enabled = yes
max_size = 2M
integrity_check = disabled
interval = 1h
prefix = https://raw.githubusercontent.com/twinwave-security/twinclams/master/
url_twinclams = ${prefix}twinclams.ldb
url_twinwave_ign2 = ${prefix}twinwave.ign2
[clampunch]
enabled = yes
max_size = 2M
integrity_check = disabled
interval = 24h
prefix = https://raw.githubusercontent.com/wmetcalf/clam-punch/master/
url_miscreantpunch099low = ${prefix}MiscreantPunch099-Low.ldb
url_exexor99 = ${prefix}exexor99.ldb
url_miscreantpuchhdb = ${prefix}miscreantpunch.hdb
[rfxn]
enabled = yes
interval= 4h
integrity_check = disabled
prefix = https://www.rfxn.com/downloads/
url_rfxn_ndb = ${prefix}rfxn.ndb
url_rfxn_hdb = ${prefix}rfxn.hdb
url_rfxn_yara = ${prefix}rfxn.yara
[interserver]
enabled = yes
interval = 1d
integrity_check = disabled
prefix = https://sigs.interserver.net/
url_interserver_sha256 = ${prefix}interserver256.hdb
url_interserver_topline = ${prefix}interservertopline.db
url_interserver_shell = ${prefix}shell.ldb
url_interserver_whitelist = ${prefix}whitelist.fp
[ditekshen]
enabled = yes
interval = 1d
integrity_check = disabled
prefix = https://raw.githubusercontent.com/ditekshen/detection/master/clamav/
url_ditekshen_ldb = ${prefix}clamav.ldb
filename_ditekshen_ldb = ditekshen.ldb
Don’t forget to customize the entries if you have any paid subscription. Set some safe file permissions on this file, especially if it contains tokens of commercial subscriptions:
Checking the new signatures before letting ClamAV use them
In the configuration file above, I call the script setup-clamav-sigs whenever signatures were updated. This script will check whether the downloaded files are really different than the signatures in /var/lib/clamav, and if they are, check them to ensure they don’t contain errors preventing ClamAV to load them. If ClamAV can successfully load them, it will copy them to /var/lib/clamav and restart clamdscan if it’s loaded. Download the script from the GitLab repository, place it in /usr/local/bin and make sure it’s executable.
Initalizing Fangfrisch
When you have set up Fangfrisch, you have to initialize it by executing
SecuriteInfo recommends setting these settings in /etc/clamav/clamd.conf in order to get the best detection while still avoiding too many false positives:
These settings ensure that not only the different parts and attachments will be separately scanned by ClamAV, but also the mail as a whole. Then we will reduce some ClamAV virus detections from infected to a spam score in Spamassassin. I do this on rules which could be more likely causing false positives. You can adapt the score to your own situation.
Automatically running Fangfrisch using a systemd timer
Create the file /etc/systemd/system/fangfrisch.service:
It is possible that you hit false positives with certain definitions. If you want to completely disable a specific virus definition, you can add its name to a text file with the ign2 extension in /var/lib/clamav/. For example for me the Sanesecurity.Badmacro.Doc.hypers caused a false positive for me, so I created the file /var/lib/clamav/local_whitelist.ign2 with content:
Sanesecurity.Badmacro.Doc.hypers
To reload the database after changing the database, run
# sudo -u clamav clamdscan --reload
Conclusion
With free third-party databases (Sanesecurity, URLHaus, Clam-punch, Twinclams, R-FX MLD, Interserver and ditekShen) it is possible to drastically improve the detection rate of ClamAV so that it becomes an excellent virus scanner for e-mail and web servers at least if you use it In combination with Amavis’ configuration to block malicious file types (such as exe, com, vbs, dll, pif, etc.) and a well configured and trained Spamassassin. If you want the best protection, add a subscription to the SecuriteInfo feeds.

Te lang om allemaal te lezen? Ga onmiddellijk door naar de conclusie.
Wie mij een beetje kent, weet dat ik privacy erg belangrijk vind. Daarom dacht ik dat contact tracing apps for COVID-19 een zeer slecht idee waren toen men daar enkele maanden geleden begon over te praten. Een app die contant bijhoudt waar je bent en wie je tegenkomt, dat is enkel iets dat je in ondemocratische landen en dictatoriale regimes verwacht, maar niet in Europa waar onze privacy gewaarborgd zou moeten zijn door de GDPR (AVG). En wat met de betrouwbaarheid van deze apps? Bluetooth was nooit voor dergelijke toepassingen ontworpen. Het zou leiden tot veel foutieve waarschuwingen. Geen denken aan dat ik zo’n app ooit zou installeren.
Althans, dat was mijn mening enkele maanden geleden. Ondertussen is mijn mening volledig veranderd. En dat is gebeurd na het lezen over gedecentraliseerde contact tracing apps gebaseerd op de Google en Apple Exposure Notification (GAEN) API en DP-3T. Ik heb reeds de Italiaanse contact tracing app Immuni gebruikt in Italië en ook in België gebruik ik de app Coronalert (Androidversie, iPhone-versie).
Volgende cartoon geeft een eenvoudig overzicht van hoe DP-3T werkt.
Elke dag wordt een nieuwe random seed (gebaseerd op de seed van de dag voordien) op de telefoon van elke gebruiker en deze dagelijkse seed wordt op te elefoon bijgehouden gedurende 14 dagen. Op basis van deze seed worden er ephermal identifiers (EphIDs) aangemaakt. Deze EphIds verandere verscheidene keren per uur.
EphIDs worden uitgewisseld met andere gebruikers van de tracking app via Bluetooth Low Energy (BLE) en elke telefoon houdt de EphIDs die hij ontvangen heeft lokaal bij op de telefoon, samen met de datum en de sterkte van het signaal, dat kan gebruikt worden om de afstand in te schatten.
Wanneer iemand positief test op COVID-19 kan die, met de hulp van de gezondheidsauthoriteiten, de seed van de eerste dag waraop hij besmettelijk was, uploaden naar een centrale server. Op dat moment worden alle voorgaande dagelijkse seeds gewist van de telefoon en wordt een compleet nieuwe random dagelijkse seed aangemaakt, zodat de gebruiker ook in de toekomst niet kan gevolgd worden.
De app downloadt regelmatig een lijst van al de dagelijkse seeds van de besmette gebruikers van de centrale server en kan op basis daarvan al de EphIDs berekenen. De app vergelijkt deze EphIDs met de lijst van EphIDs die hij onlangs is tegengekomen. Op basis van de het aantal overeenkomstige EphIDs kan de app berekenen hoe lang de twee in elkaars buurt zijn geweest en op basis van de opgeslagen signaalsterkte kan een inschatting gemaakt worden van de afstand. Als de twee langer dan een bepaalde tijd binnen een bepaalde afstand in elkaars buurt zijn geweest, dan zal de gebruiker een waarschuwing krijgen dat hij in contact is geweest met een besmettelijke persoon, samen met verdere instructies. Een contact met een besmette persoon wordt in het Engels “exposure” genoemad, Coronalert gebruikt in het Nederlands de term “blootstelling”.
Op Apple iOS kunnen apps normaal geen Bluetooth op de achtergrond gebruiken, maar een uitzondering werd gemaakt voor apps die gebruik maken van deze API. Dit betekent dat op Apple iPhone, deze API de enige manier is om een betrouwbare contact tracing app te maken. Apps die deze API niet gebruiken, zoals de StopCovid France app, moeten via work-arounds de app in de achtergrond toch naar de voorgrond halen, wat hen potentieel minder betrouwbaar maakt en een negatief effect heeft op het batterijverbruik.
Het DP-3T framework werd aangepast om gebruik te maken van de Exposure Notifications API.
De Google/Apple Exposure Notifications API en DP-3T wordt gebruikt door de Belgische contact tracing app Coronalert. Andere apps die deze API gebruiken zijn Coronamelder (Nederland), SwissCovid (Zwitserland), Immuni (Italië), Corona-Warn-App (Duitsland).
De broncode van de de implementatie van het framework voor Android en iOS werd in de tweede helft van juli 2020 gepubliceerd.
Veel gestelde vragen (FAQ) – Enkele mythes ontkracht
Deze apps zijn soms onderwerp van moedwillige fake news campages, of lokken in ieder geval hevige reacties uit die het gevolg zijn van een een gebrek aan begrip van de werking van deze apps. Hier zal ik enkele belangrijke vragen beantwoorden.
Schenden deze apps mijn privacy? Zullen de authoriteiten weten wie ik ontmoet, waar ik ben en wat ik doe?
De apps die gebruik maken van de Google Apple Exposure Notification API houden geen persoonlijke informatie bij van de gebruikers: ze kennen je naam niet, je telefoonnummer, waar je woont of andere persoonlijke gegevens. Ze verzamelen ook geen locatiegegevens, dus ze weten niet waar je bent.
Het enige dat deze apps doen, is anonieme codes uitwisselen met andere mensen in je buurt. Deze codes veranderen verscheidene malen per dag, zodat het onmogelijk is om je te volgen door middel van deze codes.
De codes die de uitgewisseld worden, worden enkel lokaal op je telefoon bijgehouden en niet in een centrale databank. Er is dus geen manier voor de authoriteiten om te weten hoeveel mensen en wie u ontmoet heeft.
Contact tracing apps maken daarnaast gebruik van uitgebreide preventiemaatregelen om uw veiligheid en privacy te beschermen: zo doen ze dummy uploads om te vermijden dat door middel van netwerkanalyse zou kunnen ontdekt worden wie een positieve test heeft afgelegd, wordt er gebruikt gemaakt van CA of certificate pinning om man-in-the-middle-aanvallen te voorkomen, enzovoort.
Deze apps zijn geen hulpmiddel voor massarveillance en zijn ook geen Big Brother zoals sommigen beweren.
Hoe kan ik zeker zijn dat de app werkt zoals beweerd wordt en echt geen privé-informatie verstuurd?
Deze apps zijn gewoonlijk open source, wat betekent dat je de zelf de code kan onderzoeken om te zien hoe de app werkt en wat deze precies doet. Zelfs als je zelf de kennis niet hebt om de code na te kijken, dan mag je er zeker van zijn dat er genoeg experten zijn die hier naar kijken en zij zullen het wel luid en duidelijk laten horen wanneer iets niet zuiver op de graat is. Het moet gezegd: vaak zijn degenen die het luidst over deze apps roepen politici uit de oppositie en activisten die nooit naar de code of de documentatie hebben gekeken.
Hier zijn links naar de broncode van enkele contact tracing apps en de documentatie:
Een eerste analyse van de broncode van de Coronalert app toont aan dat deze inderdaad niet meer gegevens bijhoudt en verstuurt dan aangekondigd en dat Sciensano en Ixor (het Belgische bedrijf dat de backendservers beheert) nooit persoonlijke data ontvangen van de app.
Waarom zou ik Google en Apple, die een slechte reputatie hebben op vlak van privacy, nu moeten vertrouwen?
Eigenlijk hebben Google en Apple deze API zelfs niet nodig om je te volgen. Als je een telefoon gebruikt met iOS of Android met Google Play Services, heb je op zich al een veel groter privacyprobleem dan deze gedecentraliseerde, open source contact tracing apps. Dat is ook het geval als je Facebook, Twitter, Instagram, TikTok, NetFlix, Spotify, FaceAp, Tinder en dergelijk apps gebruikt: deze kennen uw naam, locatie, uw interesses, vrienden en dat allemaal zonder deze API. Gedecentraliseerde contact trcacing apps weten veel minder over u dan al deze apps. Dit beeld vergelijkt de verschillende permissies die SwissCovid, Facebook en Whatsapp kunnen aanvragen op iOS. Het is duidelijk dat het niet de contact tracing app is die het meeste informatie kan verzamelen.
Daarnaast is er een manier om deze contact tracing apps te gebruiken zonder enige Google-services op je telefoon. Het microg-project heeft zijn eigen, volledig open source implementatie gemaakt van de Exposure Notification API. Deze kan geïnstalleerd worden op een Androiddistributie zoals LineageOS. Er is bevestiging dat SwissCovid en Immuni werken met de microg-implementatie van de API, dus andere apps werken wellicht ook. Op deze manier is het mogelijk om deze contact tracing apps te gebruiken zonder enige binaire code van Google of Apple.
Waarom vereist Coronalert dat Locatie aan staat op mijn Androidtelefoon als de app zogezegd mijn locatie niet bijhoudt?
Om te scannen naar Bluetooth-apparaten op Android, is het nodig dat de locatie-instelling aan staat op Android omdat dit in theorie kan gebruikt worden om uw positie te bepalen. Dit wordt bijvoorbeeld gebruikt door navigatie-apps om uw positie te bepalen in ondergrondse tunnels. In werkelijkheid is het voor apps die gebruik maken van de GAEN API niet toegelaten om uw locatie op te vragen. Het kan ook in de broncode van de app geverifieerd worden dat op geen enkel moment de locatie wordt bepaald. In Instellingen – Locatie – Machtigingen op app-niveau kan u ook nog altijd locatietoegang uitschakelen voor apps. Coronalert (of andere contact tracing app gebaseerd op de Expsoure Notificatoins API) zal in deze lijst niet verschijnen omdat deze geen locatie opvraagt.
De afstand wordt geschat op basis van de verzwakking van het signaal. Die verzwakking hangt helaas wel af van heel wat parameters, zoals het model van de telefoon dat gebruikt wordt, de richting waarin die telefoon wordt gehouden, enzovoort. Google past voor elk telefoonmodel een correctie toe op de verzwakking, zodat de waardes vergelijkbaar zouden moeten zijn tussen verschillende modellen. De drempelwaarden die worden gebruikt om waarschuwingen te geven, zijn gebaseerd op experimenten in verschillende omgevingen en kunnen in de toekomst nog aangepast worden om het aantal vals positieven en negeatieven aan te passen.
In de praktijk zal Coronalert ook niet-risicovolle contacten weergeven: er zal dan in de app staan dat er een blootstelling geweest is, maar het risico blijft op laag staan en de app blijft groen. Enkel bij een contact langer dan 15 minuten op een afstand die minder dan 1,5m geschat wordt, zal het scherm rood worden en zal er een notificatie komen over een hoogrisico-contact. Enkel in dat laatste geval zal een quarantaine en test aangeraden worden.
Zijn deze apps nuttig als niet iedereen of ten minste een groot deel van de bevolking ze gebruikt?
Contact tracing apps zijn zeker nuttig, zelfs als enkel een deel van de bevolking ze gebruikt.
Zal dit nefast zijn voor het batterijverbruik van mijn telefoon?
Doordat gebruik gemaakt wordt van Bluetooth Low Energy, zou het batterijverbruik beperkt moeten zijn. Bluetooth Low Energy is speciaal ontworpen voor een laag energieverbruik en wordt ook gebruikt om verbinding te maken met smartwatches en draadloze hoofdtelefoons. Het batterijverbruik zou minder dan 5% moeten zijn in vergelijking met een situatie waarin Bluetooth volledig uitgeschakeld is op de telefoon.
Moet ik een andere app installeren als ik naar het buitenland ga?
Merk op dat er geen uitwisseling mogelijk is met de StopCovid France app omdate deze een gecentraliseerd systeem gebruikt in plaats van het gedecentraliseerde DP-3T.
Wat vinden experts van deze apps?
Het is belangrijk om te herhalen dat DP-3T en dus het Google/Apple Expsoure Notifications framework dat erop gebaseerd is, ontworpen is door academici van universiteiten in verschillende landen. Prof. Bart Preneel (KU Leuven), een cryptograaf die meegewerkt heeft aan het de ontwikkeling van het DP-3T framework, zegt dat “voor één keer Google en Apple kiezen voor de goede kant van de privacy”.
Prof. Douglas Leith (Trinity College Dublin) heeft analyse van het netwerkverkeer van contact tracing apps gedaan. In een rapport besluit hij: “We vinden dat de apps zich over het algemeen goed gedragen op vlak van privacy, alhoewel de privacy van de Ierse, Poolse en Letse apps kan verbeterd worden.” Hij bekritiseerde wel het feit dat het Google/Apple Exposure Notifcations framework niet open source was op dat moment (intussen is de code daarvan wel openbaar) en het feit dat de Google Play Services privégegevens verzenden naar Google (iets dat op alle Androidtelefoons met Google Play Services gebeurt, los van de aanwezigheid van dit framework.)
Analyses van de broncode van de apps zoals deze van Coronalert en deze van Immuni, tonen aan dat de apps geen persoonlijke data bijhouden en versturen.
Vergeet al de samenzweringstheorieën en de bezwaren van privacy-activisten die nooit uitgezocht hebben hoe deze apps werken: gedecentraliseerde open-source contact tracing apps die gebruik maken van de Google/Apple Exposure Notification API zijn geen Big Brother en geen instrument voor massale spionage van de bevolking. Het protocol werd ontwikkeld door academici gespecialiseerd in IT-beveiliging en privacy en de broncode van de apps kan door iedereen nagekeken worden. Uitgebreide documentatie beschrijft de werking van de apps, en legt uit wat er allemaal gedaan wordt om de privacy van de gebruikers te beschermen. Door anonieme ephemerial IDs te gebruiken en geen locatiegegevens te verzamelen, weten deze contact tracing apps minder van u dan de meeste social network apps of dan het besturingssysteem van uw telefoon zelf. Als u zich zorgen maakt om uw privacy, hebt u belangrijkere dingen om u zorgen over te maken.
Contact tracing apps kunnen zeer nuttig zijn in het bestrijden van de epidemie, ook als slechts een klein deel van de bevolking ze gebruikt. Voor mij is het gewoon een kwestie van verantwoordelijkheid waarom ik gebruik maak van deze apps: om anderen te beschermen, om onze maatschappij en economie te beschermen en uiteindelijk om zelf beschermd te worden door anderen die de app gebruiken.
Those that know me a bit, know that I think that privacy is very important. For this reason when they started talking about contact tracing apps for COVID-19 a few months ago, I thought this was an extremely bad idea. Having an app constantly tracking where you are and who you meet, is only something which you think is possible in undemocratic nations and dictatorial regimes. Something you expect in North Korea, China but not in European countries, where our privacy is supposed to be protected by the GDPR. And then what about the reliability of these apps? Bluetooth was never made for this. It would result in many false positives and negatives. No way I would ever install such an app.
That was at least my opinion a couple of months ago. Now my opinion about this matter has completely changed. Reading about decentralized solutions based on the Google and Apple Exposure Notification (GAEN) API and DP-3T, has completely changed my mind. I use the Italian contact tracing app Immuni and I am willing to use a similar decentralized app from any country where I am staying.
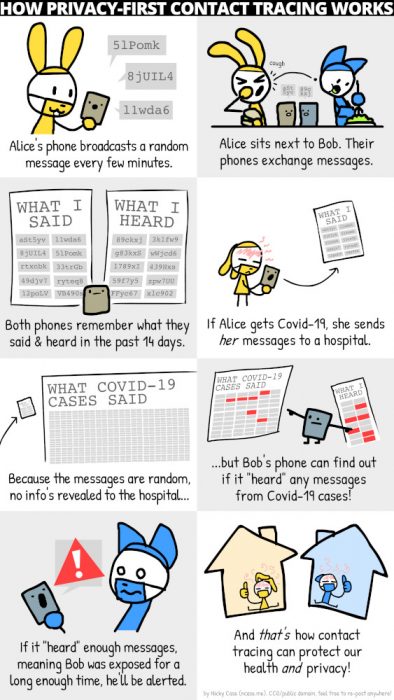
This comic shows a simple explanation of how it works.
Technically speaking, every day a new random seed (based on the seed of the day before) is created on every user’s phone, and this daily seed is saved on the phone for 14 days. From this seed are derived ephemeral identifiers (EphIDs). These EphIDs change several times an hour.
EphIDs are exchanged with other users of the tracking app by Bluetooth Low Energy (BLE) and every phone saves the EphIDs he received locally on the phone, together with the date and the attenuation of the signal, which can be used to estimate the distance.
When a user is tested positive for COVID-19, this user can, with the help of authorized health personal, upload the seed of the first day he was contagious, to a central server. All previous daily seeds are deleted from the infected user’s phone, and a completely new random daily seed is created, so that he does not become trackable in the future.
All other app users regularly download a list of all daily seeds of all contagious users from the central server and they can derive all EphIDs from them. The app compares all these EphIDs with the list of stored EphIDs which they met recently. Based on the amount of matching EphIDs the app can calculate how long the two have seen each other and based on the stored attenuation it can estimate the distance. If they were longer than a certain time within a certain distance, a warning will be given to the user that they were exposed to a contagious user, with instructions on what to do.
Apple by default does not allow background apps to use Bluetooth, except for approved contact tracing apps using this API. This means that on Apple iPhone, this API is the only way to create a reliable contact tracing app. Apps which don’t use this API, such as the StopCovid France app, have to apply work-arounds to keep the app waking up in the background, making them potentially less reliable and draining the battery more.
The DP-3T framework has since been modified to make use of the Exposure Notifications API.
Some of the apps currently available using the Google/Apple Exposure Notifications API are SwissCovid (Switzerland), Immuni (Italy), Corona-Warn-App (Germany).
The source code of the implementation of the framework for Android and iOS of the API were published the second half of July 2020.
Frequently Asked Questions – Debunking some myths
These apps appear to be the subject of deliberate fake news campaigns or at least emotional reactions resulting from a lack of understanding of how they work. Here I will try to address some questions.
Will these apps violate my privacy? Will the authorities know who I meet and where I am, what I do?
The applications based on the Google Apple Exposure Notification API do not know any personal information about the users: they don’t know your name, your phone number, where you live, or any other personal data. They also do not collect location data, so they don’t know where you are.
The only thing these apps do, is exchanging anonymous codes with other people in your neighbourhood. These codes change multiple times a day, making it impossible to keep tracking you.
The exchanged codes are only stored on your own phone and not in a central database. So there is no way for the authorities to know how many people and who you met.
Contact tracing apps usually apply even more extensive kinds of measures to protect security and privacy: for example dummy uploads are done in order to prevent network traffic analysis revealing a positive test, CA or certificate pinning to prevent MITM attacks, etc…
This is not a mass surveillance tool or Big Brother, as some try to let you believe.
How can I be sure that the app really works as promised and really does not collect and send private information?
These apps are usually open source, which means you can check the code to see how they work and what they do exactly. Even if you personally don’t have the knowledge to check the code, rest assured that there are enough experts taking a look at this, and will shout loudly when something is wrong. It has to be said: the only ones shouting loudly about these apps are politicians and activists who clearly have never looked at the source code, nor at the documentation. For example code reviews of Coronalert and Immuni have found these apps do live up to their privacy claims.
Here are some links to the source code of the different apps and their documentation:
Why should I trust Google and Apple, who have a bad track record in privacy?
Actually Google and Apple don’t even need this API to track you. If you are running a phone running iOS or Android with Google Play Services, you actually already have much larger privacy problems than these decentralized, open source contact tracing apps. The same if you are using any of Facebook, Twitter, Instagram, TikTok, NetFlix, Spotify, FaceApp, Tinder. These do know your name, your location, your interests, your friends, and this without this API. Decentralized contact tracing apps, do know much less than any of these apps. This picture compares the different permissions SwissCovid, Facebook and Whatsapp can request.
That being said, there is now a way to run these contact tracing apps without using any Google services on your phone. The microg project now includes its own completely open source implementation of the Exposure Notification API. It can be installed on an Android distribution like LineageOS. It is confirmed that SwissCovid and Immuni work with microg’s implementatoin of the API, probably other apps do too. This way you can run these applications without having to rely on any of Google’s or Apple’s proprietary binaries.
Why does this app require Location setting to be enabled on my Android phone if no location information is collected?
By using Bluetooth Low Energy, battery consumption should be limited. Bluetooth Low Energy was created specifically for low energy consumption and is also being used to connect to smartwatches and wireless headphones. Battery consumption should be less than 5% in the worst case, if you otherwise did have Bluetooth completely disabled.
Do I need to install another app when I go abroad?
However note that keys can never be exchanged with the StopCovid France app because this one uses a centralized system instead of the decentralized DP-3T.
What do experts say about these apps?
First it’s important to repeat that DP-3T, and hence the Google/Apple Exposure Notifications framework based on it, were designed by academics from universities in different countries. Prof. Bart Preneel (KU Leuven), cryptographer, who contributed to the DP-3T framework, says that “for once, Google and Apple are on the right side of privacy“.
Forget all conspiracy theories and emotional objections by privacy activists who never looked at how these apps work: open source decentralized contact tracing apps making use of the Google/Apple Exposure Notification API are not Big Brother, no mass surveillance instrument. The protocol has been developed by academics specialized in security and privacy in IT and the source code of the apps can be verified by anyone. Extensive documentation describes the working of the apps and what is being done to protect the privacy of the users. By using anonymous ephemeral IDs and not collecting any location information, these contact tracing apps know less from you than the average social network app or your phone’s OS itself, so if you are worried about privacy, you have more important things to look at.
Contact tracing apps can be very useful in combating this epidemic, also if only a small part of the population is using them. For me it’s simply a matter of responsibility installing these apps: to protect others, to protect our society and economy and in the end to get protected myself by others using the app.
Update 23 July 2020: Added links to the source of Google and Apple Exposure Notifications framework – Added info about Belgian contact tracing app in development – Added link to picture comparing permissions requested by SwissCovid, Facebook and Whatsapp
Update 6 September 2020: Added question about Location requirement on Android phones
Update 19 September 2020: Added link to source code of Belgian Coronalert app – Added info about an Expsore Notifications API implementation in microg, enabling you to run these apps without Google services
Update 4 October: add information about EU gateway service
Update 19 October: EU federation gateway service in use by 3 apps
Update 4 August 2020: replace CHAOS class by CH in dig commands so they work with kdig too, Quad9 now does support QNAME minimisation, Quad9 has alternative servers available with ECS support and without QNAME minimisation, Google now also does QNAME minimisation.
DNS is a crucial part of the Internet. However DNS traffic is usually not encrypted and can leak lots of interesting information and originally DNS also did not provide date integrity, making it vulnerable to DNS spoofing.
These days, improvements are being made to fix these problems. Data integrity is proved by DNSSEC and the privacy part is being tackled by the DNS Privacy project, proposing solutions like DNS-over-TLS (all data between resolver and client is encrypted) and QNAME minimisation (not sending the FQDN but only the relevant part to each DNS server when doing recursive resolving). More information about the DNS Privacy project can be found in this Fosdem 2018 talk.
There are basically 3 options for DNS on your client systems:
You forward all requests to your ISP’s DNS servers (which is what is usually done by default).
You forward all requests to a public global DNS service, like Cloudlfare’s 1.1.1.1, Quad9 or Google DNS.
You set up your own DNS recursor which connects itself to authoritative DNS servers.
(replace dig by kdig if you are using Knot’s DNS utils)
Some (mostly American) ISPs serve redirect pages when you enter an unexisting domain name and they often block hosts with content which is illegal in your country (child pornography, sites helping with copyright infringement, illegal gambling sites,…). In less democratic countries local DNS server are abused for censorship.
These might all be reasons in order to not to use your ISP’s DNS servers.
But at least in Europe, ISPs should be restricted by the GDPR to sell DNS data. And your ISP’s DNS servers prevent a single point of failure, a single point of data collection, and a single point of censorship. So there are advantages too.
Public global DNS services
The popular global public DNS services all support DNSSEC by default and you can connect to them using encrypted DNS-over-TLS. Some also do QNAME mimisation.
These public global DNS providers are often praised for their speed. You can find result of benchmarks of public DNS resolvers on dnsperf.com. You can also use namebench to benchmark different DNS servers . For example:
$ namebench 1.1.1.1 8.8.8.8 9.9.9.9 -x -O
You want your DNS resolver to be as close to you as possible, especially if your DNS server does not support EDNS Client Subnet (ECS). This is a method which allows a DNS recursor to send the subnet of the client to the authoritative DNS server. This is used by content delivery networks to provide you with the IP of the nearest server serving the requested content. Many privacy oriented DNS services do not support ECS, so the only information the authoritative DNS server has, is the location of your recursor. If that recursor is far away from you, this will lead to the client being sent to a far away server of the content delivery network, leading to much slower access to the content. For this reason, you should rather not use a DNS server in a foreign country, but use one which is as close as possible to your location. You can check how many hops a server is from you using the traceroute or mtr command, for example
Also for privacy reasons you would also prefer to have one in your own country, so that it’s not susceptible to legislation of a foreign country. Often, countries have a more relaxed legislation regarding spying on foreign connections.
That brings us to the last, but not least consideration: the privacy policy of the DNS service you are using. Are DNS requests being logged, for how long, and are they shared with a third party? On the PowerDNS blog there is a more elaborate article on the risks of using global DNS providers.
Your own DNS recursor
Then there is the third alternative to using a global public DNS service or your ISP’s DNS servers: running your own local recursive DNS resolver, for example with Knot Resolver. If you DNS server is well configured, it will provide you with DNSSEC validation and QNAME minimisation. However this has a serious privacy disadvantage too because this will reveal your own IP to all authoritative servers you connect to. Furthermore connections to authoritative DNS servers currently are always unencrypted, so your ISP and anyone between you and the authoritative server can see your DNS queries.
Overview of public DNS servers
In case you have decided for whatever reason you do not want to use your ISP’s DNS servers and also don’t want to do recursion yourself, there are many public DNS recursors. On the dnsprivacy.org website you can also find a list of public DNS resolvers and experimental servers with support for DNS-over-TLS. I will review a few of the most important ones here.
Cloudflare
Cloudflare‘s DNS service running on the 1.1.1.1 IP address appears to be the fastest in most cases. Unlike some other services, they do have a local server here in Brussels, which likely contributes to the great performance here. You can check which server you would be using by running this command:
$ dig +short CH TXT id.server @1.1.1.1
You can look up the three-letter code on https://www.cloudflarestatus.com/ (these are IATA codes of nearby airports). Cloudflare does not support EDNS Client Subnet, so make sure there is a server nearby when using 1.1.1.1. Cloudflare claims privacy to be one of their main advantages but in their privacy policy they admit that they share certain antonymous data with APNIC (the organization managing the IP addresses in Asia and the Pacific) for research. Cloudflare does support DNSSEC and QNAME minimisation.
In 2020, Quad9 had servers in 150 locations in 90 countries. Unfortunately there is no server in Belgium. Probably because of this, resolving of domains which DNS server is located in Belgium, is slower in the few tests I did. Because it also does not support ECS, it might not forward you to the nearest content location. You can check with the same command as Cloudflare which DNS server of Quad9 is in use for your location:
Quad9 does DNSSEC validation and now also supports QNAME minimisation.
However, Quad9 also does have alternative DNS servers (9.9.9.11) available which supports ECS. You can use these to get nearby hosts if Quad9 does not have a server in your country. However note that these alternative servers do not support QNAME minimisation. So by using ECS and disabling QNAME miminisation, more information is leaked to DNS servers.
Google
Google Public DNS, running on 8.8.8.8, appears to be the most public DNS service in use globally. According to SIDN (the registry maintaining the .nl domain), 15% of the requests come from Google’s public DNS servers. That’s probably because it’s around longer than many others (started in December 2009). Also systemd-resolved uses Google’s DNS as a fallback of there are no working default DNS servers set up. This is configured in /etc/systemd/resolved.conf.
Google supports ECS. The list of locations where it has servers can be found in the FAQ.
Which of all these options to choose, is a personal decision. Personally I think that running your own recursor on your own computer is a bad idea. All authoritative name servers will see your personal IP, and your unencrypted queries can be easily monitored by your ISP. I think this should only be considered if you are setting up a DNS server for a fairly large number of clients.
My own ISP does not support DNSSEC and QNAME minimisation. I think these two are crucial features to protect the user’s privacy and for this reason I prefer to use one of the public DNS services. I have set up Knot Resolver to forward DNS requests to Cloudflare’s DNS service over TLS. Not only does it support QNAME minimisation in addition to DNSSEC and DNS-over-TLS, it is fast and has a local server in Belgium. Combine this with the abuse.ch urlhaus RPZ file to add some protection from malicious domains. More details about this can be found in my previous blog post Secure and private DNS with Knot Resolver. I also use this set up on the network I manage at work.
Update 5 March 2018: this post was updated to work around a problem with the RPZ file from abuse.ch being ignored because it contains CRLF instead of LF where Knot Resolver does not expect them (bug 453) and to fix an error in the configuration of the predict module.
The knot-dnsutils contains the kdig command which is useful for testing your DNS server. lua-cqueues is needed for automatic detection of changes in the RPZ file.
By default the kresd daemon will listen on localhost only (see /lib/systemd/system/kresd.socket). If you want it to be available on other addresses, you will need to override the kresd.socket file. Execute
# systemctl edit kresd.socket
This will create the file /etc/systemd/system/kresd.socket.d/override.conf. Add a ListenStream and ListenDatagram line for all addresses you want it to listen on. For example:
If you want to listen on all interfaces, it is enough to put this in the file:
ListenStream=53
ListenDatagram=53
You can do the same with kresd-tls.socket to define the addresses on which to listen over DNS-over-TLS requests (port 853).
Knot Resolver’s configuration file is /etc/knot-resolver/kresd.conf. I give an example configuration file with comments:
-- Default empty Knot DNS Resolver configuration in -*- lua -*-
-- Switch to unprivileged user --
user('knot-resolver','knot-resolver')
-- Set the size of the cache to 1 GB
cache.size = 1*GB
-- Uncomment this only if you need to debug problems.
-- verbose(true)
-- Enable optional modules
modules = {
'policy',
'view',
'hints',
'serve_stale < cache',
'workarounds < iterate',
'stats',
'predict'
}
-- Accept all requests from these subnets
view:addr('127.0.0.1/8', function (req, qry) return policy.PASS end)
view:addr('[::1]/128', function (req, qry) return policy.PASS end)
view:addr('134.184.26.1/24', function (req, qry) return policy.PASS end)
-- Drop everything that hasn't matched
view:addr('0.0.0.0/0', function (req, qry) return policy.DROP end)
-- Use the urlhaus.abuse.ch RPZ list
policy.add(policy.rpz(policy.DENY, '/etc/knot-resolver/abuse.ch.rpz',true))
-- Forward all requests for example.com to 192.168.0.2 and 192.168.0.3
policy.add(policy.suffix(policy.FORWARD({'192.168.0.2', '192.168.0.3'}), {todname('example.com')}))
-- Uncomment one of the following stanzas in case you want to forward all requests to 1.1.1.1 or 9.9.9.9 via DNS-over-TLS.
-- policy.add(policy.all(policy.TLS_FORWARD({
-- { '1.1.1.1', hostname='cloudflare-dns.com', ca_file='/etc/ssl/certs/ca-certificates.crt' },
-- { '2606:4700:4700::1111', hostname='cloudflare-dns.com', ca_file='/etc/ssl/certs/ca-certificates.crt' },
--
-- })))
-- policy.add(policy.all(policy.TLS_FORWARD({
-- { '9.9.9.9', hostname='dns.quad9.net', ca_file='/etc/ssl/certs/ca-certificates.crt' },
-- { '2620:fe::fe', hostname='dns.quad9.net', ca_file='/etc/ssl/certs/ca-certificates.crt' },
-- })))
-- Prefetch learning (20-minute blocks over 24 hours)
predict.config({ window = 20, period = 72 })
I use the urlhaus.abuse.ch RPZ file, which contains a blacklist of malicious domains. You will have to download it first:
# cd /etc/knot-resolver
# curl https://urlhaus.abuse.ch/downloads/rpz/ | sed -e 's/\r$//' -e '/raw.githubusercontent.com/d'> /etc/knot-resolver/abuse.ch.rpz
I use sed to convert CRLF in LF (otherwise Knot Resolver fails to parse the file), and I filter out raw.githubusercontent.com. According to urlhaus.abuse.ch it hosts some malware, but there is too much useful stuff there too to block the domain completely.
In order to update it automatically, create /etc/systemd/system/update-urlhaus-abuse-ch.service:
[Unit]
Description=Update RPZ file from urlhaus.abuse.ch for Knot Resolver
[Service]
Type=oneshot
ExecStart=/bin/sh -c 'curl https://urlhaus.abuse.ch/downloads/rpz/ | sed -e 's/\r$//' -e '/raw.githubusercontent.com/d'> /etc/knot-resolver/abuse.ch.rpz'
and then create a timer which will run the service approximately every 10-15 minutes./etc/systemd/system/update-urlhaus-abuse-ch.timer:
[Unit]
Description=Update RPZ file from urlhaus.abuse.ch for Knot Resolver
[Timer]
OnCalendar=*:0/10
Persistent=true
RandomizedDelaySec=300
[Install]
WantedBy=timers.target
Use the first two commands to enable and start the timer. You can check the status using the last command:
Now you need to enable and start one or more instances of kresd. kresd is single-threaded, so if you want to make use of all of your CPU cores, you can start as many instances as the numbers of cores you have. For example in order to enable and start 4 instances run this command:
Often you run different web applications on the same web servers. For security reasons, it is strongly recommended to run them in separate PHP-FPM processes under different user accounts. This way permissions can be set so that the user account of one PHP application, cannot access the files from another PHP application. Also open_basedir can be set so that accessing any files outside the base directory becomes impossible.
To create a separate PHP-FPM process for a PHP application on Debian Stretch with PHP 7.0, create a file /etc/php/7.0/fpm/pool.d/webapp.conf with these contents:
In the above example the webapp is located in /home/webapp, but you can of course also use a directory somewhere in /var/www.
I strongly recommend against making all your PHP files in /home/webapp owned by webapp_php. This is a dangerous situation, because PHP can overwrite the code itself. This makes it possible for malware to overwrite your PHP files with malicious code. Only make the directories where PHP really needs to be able to write into (for example a directory where files uploaded in your web applications are stored), writable for the webapp_php user. Your code itself should be owned by a different user than webapp_php. It can be a dedicated user account, or just root.
Finally we need to configure Apache to contact the right php-fpm instance for the web application. Create a file /etc/apache2/conf-available/php7.0-webapp-fpm.conf:
<Directory /home/webapp/public_html>
# Redirect to local php-fpm if mod_php is not available
<IfModule proxy_fcgi_module>
# Enable http authorization headers
<IfModule setenvif_module>
SetEnvIfNoCase ^Authorization$ "(. )" HTTP_AUTHORIZATION=$1
</IfModule>
<FilesMatch ". \.ph(p[3457]?|t|tml)$">
SetHandler "proxy:unix:/run/php/php7.0-webapp-fpm.sock|fcgi://localhost-webapp"
</FilesMatch>
<FilesMatch ". \.phps$">
# Deny access to raw php sources by default
# To re-enable it's recommended to enable access to the files
# only in specific virtual host or directory
Require all denied
</FilesMatch>
# Deny access to files without filename (e.g. '.php')
<FilesMatch "^\.ph(p[3457]?|t|tml|ps)$">
Require all denied
</FilesMatch>
</IfModule>
</Directory>
This file is based on the default php7.0-fpm.conf. You will need to create a symlink to make sure this gets activated:
# cd /etc/apache2/conf-enabled
# ln -s ../conf-available/php7.0-webapp-fpm.conf .
Now restart your Apache and PHP-FPM services and you should be ready. You can see the user your code in /home/webapp/public_html is being run as in the output of the phpinfo() function.
In a previous blog post, I wrote how to secure OpenSSH against brute force attacks. However, what if someone manages to get a shell on your system, despite all your efforts? You want to protect your system from your users doing nasty things? It is important to harden your system further according to the principle of defense in depth in order.
Software updates
Make sure you are running a supported distribution, and by preference the most recent version one. For example, Debian Jessie is still supported, however upgrading to Debian Stretch is strongly recommended, because it offers various security improvements (more recent kernel with new security hardening, PHP 7 with new security related features, etc…)
Install amd64-microcode (for AMD CPU’s) or intel-microcode (for Intel CPU’s) which are needed to protect against hardware vulnerabilities such as Spectre, Meltdown and L1TF. I recommend installing it from stretch-backports in order to have the latest firmware.
Automatic updates and needrestart
I recommend installing unattened-upgrades . You can configure it to just download updates or to download and install them automatically. By default, unattended-upgrades will only install updates from the official security repositories. This way it is relatively safe to let it do this automatically. If you have already installed it, you can run this command to reconfigure it:
# dpkg-reconfigure unattended-upgrades
When you update system libraries, you should also restart all daemons which are using these libraries to make them use the newly installed version. This is exactly what needrestart does. After you have run apt-get, it will check whether there are any daemons running with older libraries, and will propose you to restart them. If you use it with unattended-upgrades, you should set this option in /etc/needrestart/needrestart.conf to make sure that all services which require a restart are indeed restarted:
$nrconf{restart} = 'a';
Up-to-date kernel
Running an up-to-date kernel is very important, because also the kernel can be vulnerable. In the worst case, an outdated kernel can be exploited to gain root permissions. Do not forget to reboot after updating the kernel.
In case you build your own kernel, you can use kconfig-hardened-check to get recommendation for a hardened kernel configuration.null
Firewall: filtering outgoing traffic
It is very obvious to install a firewall which filters incoming traffic. However, have you considered also filtering outgoing traffic? This is a bit more difficult to set up because you need to whitelist all outgoing hosts to which connections are needed (I think of your distribution’s repositories, NTP servers, DNS servers,…), but it is a very effective measure which will help limiting damage in case a user account gets compromised, despite all your other protective efforts.
Ensuring strong passwords
Prevent your users from setting bad passwords by installing libpam-pwquality, together with some word lists for your language and a few common languages. These will be used for verifying that the user is not using a common word as his password. libpam-quality will be enabled automatically after installation with some default settings.
Please note that by default, libpam-pwquality will only enforce strong passwords when a non-root user changes its password. If root is setting a password, it will give a warning if a weak password is set, but will still allow it. If you want to enforce it for root too (which I recommend), then add enforce_for_root in the pam_pwquality line in /etc/pam.d/common-password:
In order to log out inactive users, set a timeout of 600 seconds on the Bash shell. Create /etc/profile.d/tmout.sh:
export TMOUT=600
readonly TMOUT
Prevent creating cron jobs
Make sure users cannot set cron jobs. In case an attacker gets a shell on your system, often cron will be used to ensure the malware continues running after a reboot. In order to prevent normal users to set up cron jobs, create an empty /etc/cron.allow.
Protect against fork bombs and excessive logins and CPU usage
Create a new file in /etc/security/limits.d to impose some limits to user sessions. I strongly recommend setting a value for nproc, in order to prevent fork bombs.maxlogins is the maximum number of logins per user, and cpu is used to set a limit on the CPU time a user can use (in minutes):
* hard nproc 1024
* hard maxlogins 4
1000: hard cpu 180
Hiding processes from other users
By mounting the /proc filesystem with the hidepid=2 option, users cannot see the PIDs of processes by other users in /proc, and hence these processes also become invisible when using tools like top and ps. Put this in /etc/fstab to mount /proc by default with this option:
Several kernel settings can be set at run time using sysctl. To make these settinsg permanent, put these settings in files with the .conf extension in /etc/sysctl.d.
It is possible to hide the kernel messages (which can be read with the dmesg command) from other users than root by setting the sysctl kernel.dmesg_restrict to 1. On Debian Stretch and later this should already be the default value:
kernel.dmesg_restrict = 1
From Linux kernel version 4.19 on it’s possible to disallow opening FIFOs or regular files not owned by the user in world writable sticky directories. This setting would have prevented vulnerabilities found in different user space programs the last couple of years. This protection is activated automatically if you use systemd version 241 or higher with Linux 4.19 or higher. If your kernel supports this feature but you are not using systemd 241, you can activate it yourself by setting the right sysctl settings:
fs.protected_regular = 1
fs.protected_fifos = 1
Also check whether the following sysctl’s have the right value in order to enable protection hard links and symlinks. These work with Linux 3.6 and higher, and likely will already be enabled by default on your system:
The Linux kernel includes eBPF, the extended Berkeley Packet Filter, which is a VM in which unprivileged users can load and run certain code in the kernel. If you are sure no users need to call bpf(), it can be disabled for non-root users:
Finally I want to mention Lynis, a security auditing tool. It will check the configuration of your system, and make recommendations for further security hardening.
Further ideas
Install AIDE, the Advanced Intrusion Detection Environment, which warns you when files are unexpectedly modified.
Use pam_namespace to give every user a private /tmp and /var/tmp.
It looks like you are not using an adblocker. Advertisements are often abused to lead you to malicious sites and to track you, invading your private. For this reason I strongly recommend you to install Ublock Origin. By preference use the Firefox web browser because Ublock Origin works best in this browser.